Sweet Potato Casserole: Classic Recipe Steps
Sweet Potato Casserole: Classic Recipe Steps
There’s something magical about the aroma of sweet potato casserole baking in the oven during holiday gatherings. This beloved comfort food has graced American dinner tables for generations, combining creamy sweet potato filling with a buttery topping that creates an irresistible contrast of textures. Whether you’re preparing this dish for Thanksgiving, Christmas, or any special occasion, mastering the classic recipe ensures you’ll create a memorable side dish that keeps guests coming back for seconds.
The beauty of an old fashioned sweet potato casserole lies in its simplicity and elegance. Unlike trendy modern variations, the traditional approach relies on quality ingredients and proper technique to let the natural sweetness of potatoes shine through. This comprehensive guide walks you through every step, from selecting the perfect sweet potatoes to achieving that golden, crunchy topping that makes this dish truly special.

Selecting and Preparing Your Sweet Potatoes
The foundation of any excellent sweet potato casserole begins with choosing the right potatoes. Look for medium to large sweet potatoes with unblemished skin and firm texture. Avoid those with soft spots or sprouting eyes, as these indicate age and potential spoilage. The best varieties for casseroles are the darker-skinned types, often labeled as yams in American supermarkets, which have a creamier texture and deeper flavor than lighter varieties.
Begin by washing your sweet potatoes thoroughly under running water, using a vegetable brush to remove any soil. Pat them dry completely, as excess moisture can affect cooking time and texture. For an old fashioned sweet potato casserole, you’ll typically need about four to five medium potatoes, which yields approximately three cups of cooked puree.
To prepare the potatoes, pierce each one several times with a fork to prevent explosion during cooking. Bake them directly on your oven rack at 400°F for approximately 45 to 60 minutes, depending on size. The potatoes are done when a knife slides through the flesh effortlessly and they feel soft when squeezed (using oven mitts, of course). Some cooks prefer boiling potatoes in salted water for 20 to 30 minutes until tender, though baking intensifies their natural sweetness.
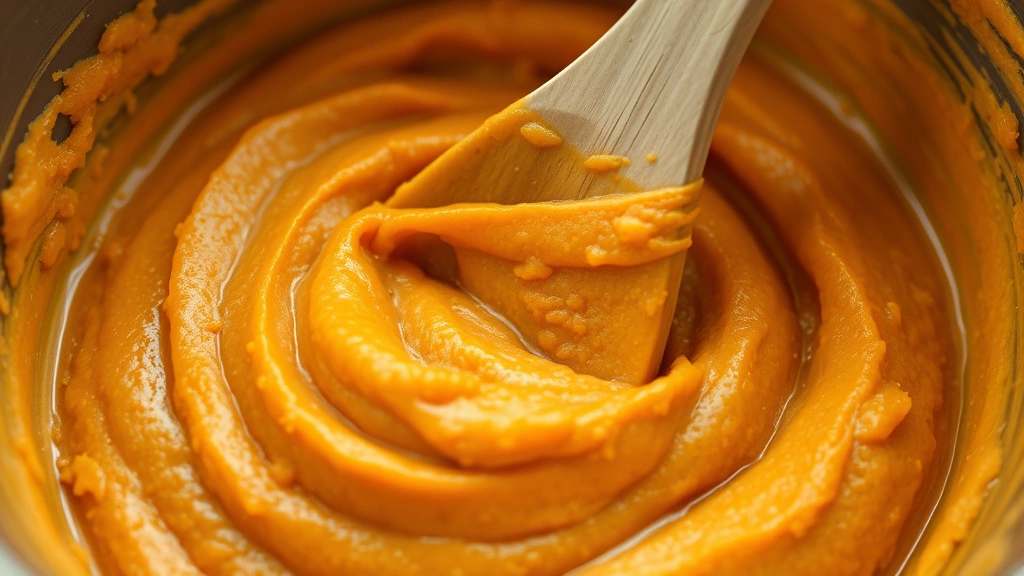
Once cooked, allow the potatoes to cool until you can handle them comfortably. Cut them in half and scoop the soft flesh into a bowl, discarding the skin. For the smoothest filling, pass the cooked potatoes through a ricer or food mill. If you don’t have these tools, a hand mixer works well, though it may not achieve quite the same silky texture. Mash until completely smooth, removing any lumps that could affect your final dish’s consistency.
Proper preparation at this stage ensures your filling has the ideal creamy foundation. Many home cooks skip the ricer step, but this extra effort distinguishes a professional-quality casserole from an ordinary one. The smoother your base, the more elegant your finished dish will be.

Creating the Perfect Filling
With your sweet potato puree ready, it’s time to build the filling that makes this dish memorable. The classic combination includes butter, brown sugar, eggs, vanilla extract, cinnamon, nutmeg, and a touch of salt. These ingredients work together to enhance the natural sweetness while adding warmth and depth.
Start by combining three tablespoons of softened butter with one cup of packed brown sugar in a large mixing bowl. Cream these together until light and fluffy, approximately two to three minutes of beating. This step incorporates air into the mixture, creating a lighter texture in the final casserole. Add your smooth sweet potato puree gradually while continuing to mix, ensuring even distribution of the butter and sugar throughout.
In a separate small bowl, whisk together three large eggs with one teaspoon of vanilla extract. Add this mixture to your sweet potato base slowly while mixing on medium speed. The eggs act as a binder, helping your casserole achieve a custard-like consistency that’s neither too firm nor too loose.
For the spice blend, combine one teaspoon of ground cinnamon, half a teaspoon of ground nutmeg, quarter teaspoon of ground ginger, and a pinch of ground cloves. These warm spices are quintessential to the old fashioned sweet potato casserole experience. Add them gradually while tasting as you go, adjusting to your preference. Some families prefer more cinnamon, while others emphasize the nutmeg—there’s no single correct answer, just family tradition.
Season with half a teaspoon of salt, which might seem counterintuitive but actually amplifies the sweet potato flavor and prevents the dish from tasting one-dimensional. Finish with a splash of milk or cream—approximately one-quarter cup—to achieve the right consistency. Your filling should be smooth and spreadable, similar to pudding, not stiff like dough.
At this point, you might consider adding a tablespoon of bourbon or rum for extra depth, though this remains optional and completely traditional. Pour your filling into a buttered 9-by-13-inch baking dish, smoothing the top with a spatula.
Mastering the Topping Technique
The topping transforms your sweet potato casserole from simple to spectacular. The traditional version combines pecans or walnuts with brown sugar, cinnamon, and butter, creating a crunchy, caramelized layer. Some versions add marshmallows on top, though purists argue the nut topping better represents the classic preparation.
For the nut topping, combine one cup of chopped pecans with one-half cup of packed brown sugar, one-quarter cup of all-purpose flour, one-quarter teaspoon of cinnamon, and one-quarter teaspoon of salt in a medium bowl. Cut four tablespoons of cold butter into small cubes and work it into the nut mixture using your fingertips until the texture resembles coarse breadcrumbs. This texture is crucial—if your mixture is too fine, it becomes dense; too chunky, and it won’t bind properly during baking.
Spread this topping evenly over your sweet potato filling, pressing gently so it adheres. Avoid pressing too hard, which compacts the mixture and prevents proper browning. The topping should look rustic and slightly loose, with visible nut pieces visible throughout.
For those preferring a marshmallow topping, wait until the casserole has baked for 25 minutes before adding the marshmallows. This prevents them from burning while ensuring they melt and brown beautifully. Use large marshmallows or a combination of large and mini marshmallows, arranging them in a single layer across the top. The marshmallows will expand during baking, creating that iconic golden-brown appearance.
Some cooks use a hybrid approach, creating two distinct layers—the nut topping beneath, marshmallows on top. This combination offers textural variety and appeals to guests with different preferences. Whatever topping you choose, ensure it covers the filling completely to prevent excessive browning of the edges.
Baking and Serving Tips
Preheat your oven to 350°F and position the rack in the center. Place your prepared casserole on a baking sheet (this catches any drips and aids cleanup) and bake for 30 to 35 minutes if using only a nut topping. The filling should be set but still slightly jiggly in the center when you gently shake the dish—it continues cooking slightly after removal from the oven.
If adding marshmallows, bake the casserole for 25 minutes first, then carefully remove it and distribute marshmallows evenly across the top. Return to the oven for an additional 10 to 15 minutes until the marshmallows are puffed and golden brown. Watch carefully during this final stage, as marshmallows can burn quickly if your oven runs hot.
The casserole is done when a toothpick inserted into the filling (avoiding the topping) comes out clean or with just a few moist crumbs. The filling should not jiggle excessively, but slight movement indicates it’s perfectly cooked. Overbaking results in a dry, grainy texture, so err on the side of slightly underdone.
Remove from the oven and let rest for 10 minutes before serving. This resting period allows the filling to set slightly, making it easier to serve neat portions. If you’ve made an old fashioned sweet potato casserole ahead of time, you can reheat it gently at 325°F for 15 to 20 minutes, covered with foil to prevent the topping from over-browning.
Serve warm with a dollop of whipped cream or a scoop of vanilla ice cream for a luxurious touch. The contrast between warm casserole and cool cream is absolutely divine. Some families prefer their casserole slightly cooled to room temperature, which brings out different flavor notes and changes the texture slightly.
Storage and Make-Ahead Strategies
One of the greatest advantages of sweet potato casserole is its make-ahead potential. You can prepare the entire dish up to two days in advance, covering it tightly with plastic wrap and refrigerating until baking time. This convenience makes it perfect for busy holiday schedules when oven space is at a premium.
If baking from cold, add 10 to 15 minutes to your baking time and cover with foil for the first 20 minutes to prevent the topping from browning too quickly while the filling heats through. Alternatively, allow the casserole to come to room temperature for 30 minutes before baking, which reduces cooking time slightly.
Leftover casserole keeps beautifully in an airtight container for up to four days. Reheat individual portions in the microwave (about two minutes for a standard serving) or warm the entire casserole in a 325°F oven covered with foil. Some people enjoy cold sweet potato casserole straight from the refrigerator as an unexpected breakfast treat.
For longer storage, freeze the unbaked casserole for up to three months. Thaw overnight in the refrigerator before baking, adding a few extra minutes to the baking time. Alternatively, freeze the baked casserole, then reheat gently in the oven. While freezing slightly affects texture, the flavor remains excellent, making this an ideal strategy for preparing multiple casseroles in advance.
The versatility of this classic dish means it works equally well for formal holiday dinners or casual weeknight meals. Whether you’re cooking for two or twenty, this recipe scales easily—simply adjust ingredient quantities proportionally and use appropriate baking dish sizes.
FAQ
Can I use canned sweet potato puree instead of fresh?
Yes, canned sweet potato puree works in a pinch, though fresh provides superior flavor and texture. If using canned, drain any excess liquid and use approximately one 29-ounce can (about three cups) to replace fresh potatoes. Be aware that some canned varieties contain added sugar, so reduce the brown sugar in your recipe by one-quarter cup.
What’s the difference between sweet potatoes and yams?
Despite common usage, true yams are starchy tubers from Africa, while American supermarkets typically sell sweet potatoes. The darker-skinned varieties labeled as yams are actually sweet potatoes with orange flesh, which work perfectly for this casserole. True yams have rough, bark-like skin and pale flesh, and are rarely found in standard grocery stores.
Can I make this casserole dairy-free?
Absolutely. Replace butter with coconut oil or dairy-free butter in equal amounts. Use coconut milk or almond milk instead of regular milk. The flavor changes slightly but remains delicious. For the topping, use dairy-free butter and ensure your brown sugar is vegan if that’s important to your dietary needs.
Why is my casserole watery?
This typically results from too much liquid in the filling or insufficient baking time. Fresh sweet potatoes sometimes release moisture during cooking. Ensure your potatoes are well-drained after cooking, and don’t add milk if your mixture already seems loose. Bake until a toothpick test shows the center is set, not just warm.
Can I prepare just the filling ahead of time?
Yes, prepare the filling up to one day in advance and refrigerate in an airtight container. When ready to bake, transfer to your baking dish, add the topping, and proceed with baking. This approach provides maximum flexibility for holiday meal planning.
Related Posts
Perfect Old Fashioned Donut: Baker’s Secrets
Old Fashioned Chocolate Pie Recipe? Chef’s Favorite
