Smokey Eyeshadow Tips? MUA-Approved Techniques
Smokey Eyeshadow Tips: MUA-Approved Techniques for Flawless Application
The smokey eye is one of the most iconic and versatile makeup looks in the beauty world. Whether you’re preparing for a night out, a special event, or simply want to elevate your everyday makeup routine, mastering the smokey eyeshadow technique is essential. This sultry, blended eye look has remained a staple in professional makeup artistry for decades, and for good reason—it’s universally flattering, endlessly customizable, and absolutely transformative.
Professional makeup artists (MUAs) have refined the art of creating the perfect smokey eye through years of practice and experimentation. The key to achieving that coveted smoldering effect lies not just in product selection, but in understanding the fundamental techniques that separate a muddy, poorly blended eye from a beautifully executed smokey masterpiece. In this comprehensive guide, we’ll explore the professional secrets that top makeup artists use to create stunning smokey eyeshadow looks that work for every eye shape, skin tone, and occasion.
Understanding the Smokey Eye Fundamentals
Before diving into application techniques, it’s crucial to understand what makes a smokey eye actually “smokey.” The term refers to the soft, diffused blending of dark eyeshadow colors that creates a hazy, gradient effect across the eyelid. Unlike dramatic, sharply defined eyeshadow looks, the smokey eye celebrates seamless transitions between multiple shades, creating depth and dimension without harsh lines.
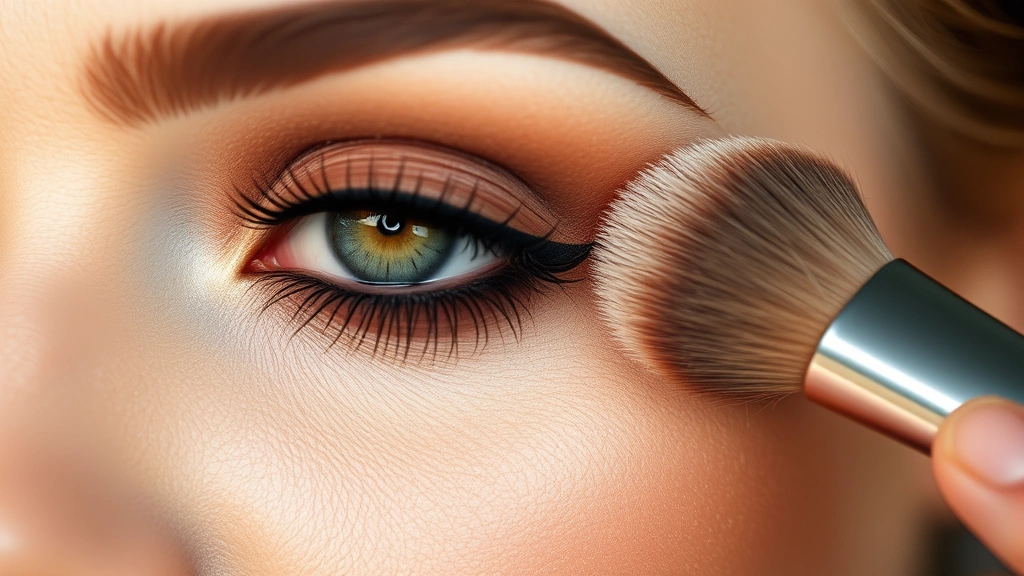
The foundation of any successful smokey eye begins with primer. Professional makeup artists unanimously agree that skipping this step is a recipe for disaster. A good eyeshadow primer creates a smooth canvas, extends wear time, and prevents creasing—all essential factors when working with the multiple layers required for a smokey eye. Apply primer not just to the lid, but slightly above the natural crease to give yourself room to work and blend.
Understanding color theory is equally important. The smokey eye traditionally uses a neutral palette of blacks, grays, browns, and taupes, but modern interpretations have expanded to include jewel tones, metallics, and even colorful variations. The principle remains the same: you’re building depth through strategic shade placement, with darker colors concentrated in the crease and outer lid, and lighter shades on the inner lid and brow bone.
One critical aspect that separates amateur applications from professional results is the concept of “mapping” your eye. Before touching brush to lid, professional MUAs mentally (or sometimes literally) divide the eye into zones: the inner lid, the lid itself, the crease, and the outer corner. Each zone serves a specific purpose in the overall composition, and understanding this spatial relationship is fundamental to achieving a polished, intentional look rather than a haphazard blend of colors.
Essential Tools and Brushes for Blending
You cannot create a professional smokey eye without the right tools. This is where many makeup enthusiasts stumble—they invest in beautiful, expensive eyeshadows but neglect their brush collection. Professional makeup artists will tell you that quality brushes are non-negotiable for achieving seamless blends.
The essential brush collection for smokey eyes includes: a fluffy blending brush (typically a large, domed brush used for diffusing color in the crease), a pencil or shader brush (smaller, flat-topped brush for precise lid application), a small blending brush (for detailed work in the outer corner), and a brow bone highlight brush (flat shader for applying lighter shades). Each brush serves a distinct purpose, and investing in quality versions made with natural or high-quality synthetic bristles will dramatically improve your results.
When selecting brushes, pay attention to bristle density and shape. Fluffy blending brushes should have soft, densely packed bristles that allow for smooth, circular motions without harsh lines. Shader brushes should be slightly stiffer to pick up adequate color payoff on the lid. Synthetic brushes work wonderfully for creamy, liquid products, while natural hair brushes excel with powder products. Many professional makeup artists use a combination of both.
The technique of brush application is just as important as the tools themselves. Professional MUAs use specific motions when blending: circular motions for diffusing color in the crease, windshield wiper motions for the outer corner, and stippling (dabbing) motions for building color gradually. These intentional movements, combined with the right brush, create the signature seamless blend that defines a professional smokey eye.
Color Selection and Shade Layering
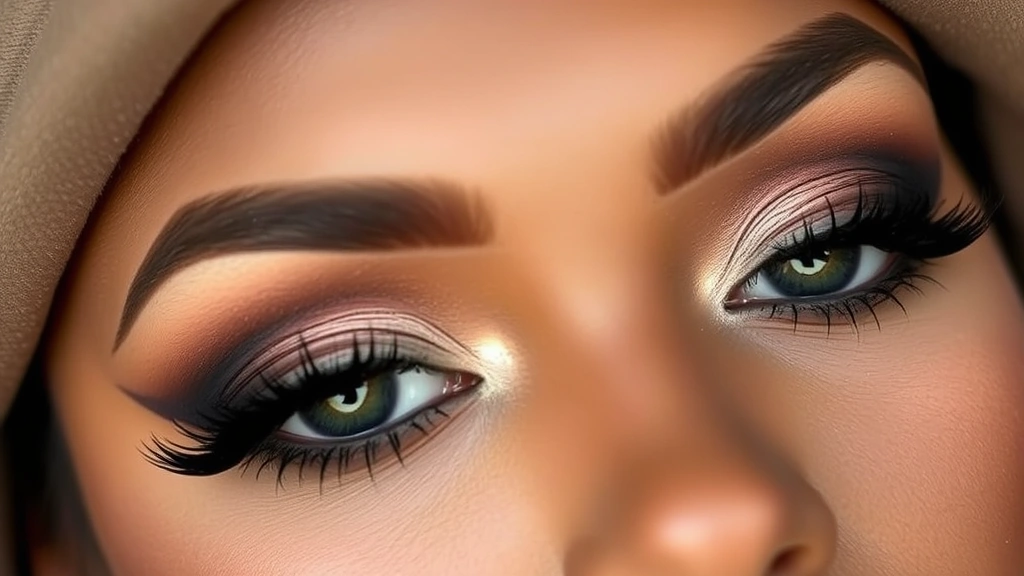
Creating a compelling smokey eye requires understanding how to layer multiple shades strategically. The most common approach, favored by professional makeup artists worldwide, follows a simple formula: a transition shade, a medium shade, and a dark shade, with a highlight shade on the inner lid and brow bone.
The transition shade is your secret weapon. This is typically a warm, neutral brown or taupe that’s only slightly darker than your skin tone. Applied in the crease with a fluffy brush using windshield wiper motions, the transition shade creates a soft base that prevents harsh lines and helps subsequent darker shades blend seamlessly. Many beginners skip this step, which is why their smokey eyes often look muddy or poorly blended.
The medium shade is where you begin to build dimension. This might be a medium gray, brown, or bronze depending on your color palette. Applied to the lid itself with a shader brush, this shade should have good pigmentation and blend smoothly with your transition shade. The key is not to deposit too much color at once—build gradually, layering as needed.
The dark shade is your defining color. This is where the “smokey” really comes in—typically a deep charcoal, black, or dark brown concentrated in the outer corner and along the upper lash line. Professional MUAs often use this shade with a damp brush to intensify color and create a more dramatic effect. The crucial skill here is knowing how much to apply and where to place it for maximum impact without overwhelming the eye.
The highlight shade (usually a champagne, ivory, or light shimmer) is applied to the inner corner and brow bone to add brightness and lift to the eye. This creates contrast with the darker outer portions and prevents the entire eye from looking heavy or sunken. This final touch is what elevates a smokey eye from nice to absolutely stunning.
Step-by-Step Application Technique
Now that you understand the theory, let’s walk through the professional application process. Start with a clean, moisturized eyelid and apply your eyeshadow primer, pressing it in gently and allowing it to set for 30 seconds.
Step 1: Apply Transition Shade
Using your fluffy blending brush, apply your transition shade in the crease using windshield wiper motions. Work back and forth, gradually building coverage until you have a soft, diffused line. Don’t worry about intensity at this stage—you’re creating a foundation for blending. This step is crucial for achieving that professional, seamless look.
Step 2: Apply Medium Shade to Lid
Switch to your shader brush and pick up your medium shade. Gently pat and swipe this color onto your eyelid, concentrating on the center and working slightly into the crease. Use a pressing motion rather than swiping to build color gradually. Professional makeup artists often apply this shade with a dry brush first, then go back with a slightly damp brush to intensify the color.
Step 3: Deepen the Crease
Using your small blending brush and your medium shade, blend along the crease line with soft, circular motions. This creates a more defined crease while maintaining softness. You’re essentially creating a gradient from the medium shade on the lid to the transition shade above.
Step 4: Apply Dark Shade to Outer Corner
This is where precision matters. Using a pencil or small shader brush, apply your dark shade to the outer corner in a windshield wiper or V-shape motion. Concentrate the darkest color at the lash line and outer corner, gradually diffusing it inward. Many professional MUAs use a damp brush for this step to create a more intense, smudged effect. Don’t apply this shade all the way across the lid—the goal is to create dimension, not a completely dark eye.
Step 5: Blend the Transition
Using your fluffy blending brush with minimal product, gently blend where the dark shade meets the medium shade. Use light, circular motions to soften any harsh lines. This is the step that separates professional results from amateur applications.
Step 6: Add Highlight
Apply your highlight shade to the inner corner and brow bone using a flat shader brush. This adds brightness and lift, creating contrast with the darker outer portions. Press the color onto the skin gently rather than swiping.
Step 7: Define the Lower Lash Line
Using a pencil brush and your dark shade, line the upper lash line with a thin line of dark shadow or eyeliner. For a softer smokey effect, use a smudged line. For the lower lash line, apply a lighter shade (your medium shade or a soft gray) along the entire line, then deepen just the outer corner with your dark shade.
Adapting Smokey Eyes for Different Eye Shapes
Professional makeup artists understand that the smokey eye isn’t one-size-fits-all. The placement and intensity of shades should be adapted based on individual eye shape to ensure the most flattering results.
For Hooded Eyes: Place your darkest shade higher in the crease to create the illusion of a larger lid space. Avoid applying dark shadow to the inner lid, as this can make hooded eyes appear smaller. Focus the medium shade on the visible portion of the lid and concentrate darker shades in the crease and above.
For Close-Set Eyes: Apply more dark shadow to the outer corner, extending slightly beyond the natural eye shape to create the illusion of wider-set eyes. Keep the inner corner brighter with your highlight shade to enhance the widening effect.
For Wide-Set Eyes: Bring darker shades closer to the inner corner to create the illusion of eyes that are closer together. Concentrate your medium shade more toward the inner lid, and use dark shadow along the entire upper lash line rather than just the outer corner.
For Round Eyes: Use a V-shaped placement of dark shadow in the outer corner to add definition and elongate the eye shape. Keep the center of the lid slightly brighter to maintain dimension without making eyes appear rounder.
Common Mistakes and How to Fix Them
Even experienced makeup enthusiasts make smokey eye mistakes. Professional MUAs have identified the most common pitfalls and how to avoid (or correct) them.
Muddy, Undefined Appearance: This usually results from using too many similar shades without adequate contrast or from over-blending to the point where all definition is lost. Solution: Ensure you have clear contrast between your transition, medium, and dark shades. Don’t over-blend—sometimes less is more.
Harsh Lines: This occurs when shades aren’t blended sufficiently or when you skip the transition shade entirely. Solution: Always use a transition shade and invest time in gentle, circular blending motions with a fluffy brush.
Uneven Application: Applying more product to one eye than the other is a common mistake. Solution: Use the same number of brush strokes and the same amount of pressure on both eyes. Many professional MUAs apply one step to both eyes before moving to the next step to ensure symmetry.
Eyeshadow Fallout: Dark eyeshadow particles falling onto the cheeks is frustrating and can ruin your overall look. Solution: Apply eyeshadow before face makeup, or use a piece of tape or a shadow shield under the eye while applying dark shades. Tap off excess product from your brush before application.
Creasing and Fading: Poor primer application or inadequate primer coverage can cause the smokey eye to crease or fade throughout the day. Solution: Use a quality eyeshadow primer and apply it generously to the entire lid area and slightly above the crease.
Professional Tips from Celebrity Makeup Artists
Top celebrity makeup artists have shared their insider secrets for creating flawless smokey eyes. One universal tip is the importance of quality eyeshadow primer—makeup artists consistently emphasize that this is where the smokey eye foundation is built.
Another professional secret involves using a setting spray specifically formulated for eyeshadow. These products help eyeshadow adhere better to the skin and prevent creasing, which is especially important for smokey eyes that involve multiple layers of product.
Professional makeup artists also recommend investing in a few high-quality, versatile eyeshadow palettes rather than numerous cheap ones. A good neutral palette with multiple shades of browns, grays, and blacks will allow you to create countless smokey eye variations. Quality formulations ensure better blendability and color payoff.
Lighting is another often-overlooked professional consideration. Professional makeup artists apply smokey eyes under bright, preferably natural lighting. This allows you to see exactly where you’re placing color and ensures the look translates well in photos and in person. Many makeup mistakes result from applying makeup under inadequate lighting.
Finally, professional MUAs emphasize the importance of practice and patience. The smokey eye is a skill that improves with repetition. Don’t expect perfection on your first attempt—even makeup artists spend years refining their technique. The more you practice, the faster you’ll work and the more refined your results will become.
For those interested in understanding how environmental factors affect makeup application, understanding your application environment is key. Temperature, humidity, and lighting all impact how makeup applies and wears. Additionally, the interaction between your skin and makeup products varies based on your individual skin’s characteristics and the surrounding conditions.
FAQ
What’s the difference between a smokey eye and a regular eyeshadow look?
The primary difference is in the blending and diffusion of colors. A smokey eye features soft, seamlessly blended transitions between multiple shades, creating a hazy, gradient effect. Regular eyeshadow looks may have more defined color placement and distinct lines between shades. The smokey eye is all about the soft, smudged aesthetic.
Can I create a smokey eye with warm tones instead of cool grays and blacks?
Absolutely! While the classic smokey eye uses cool-toned grays and blacks, you can absolutely create a warm-toned smokey eye using warm browns, bronzes, and warm taupes. The technique remains the same—it’s all about layering and blending multiple shades to create depth and dimension. This variation works beautifully for warm skin tones and warm undertones.
How long should a smokey eye last throughout the day?
With proper primer application and a quality setting spray, a well-executed smokey eye should last 8-12 hours or more. If your smokey eye is creasing or fading before this time, you likely need a better eyeshadow primer or more generous primer application. Professional makeup artists often use primers specifically designed for long-wearing applications on special occasions.
Is a smokey eye appropriate for daytime wear?
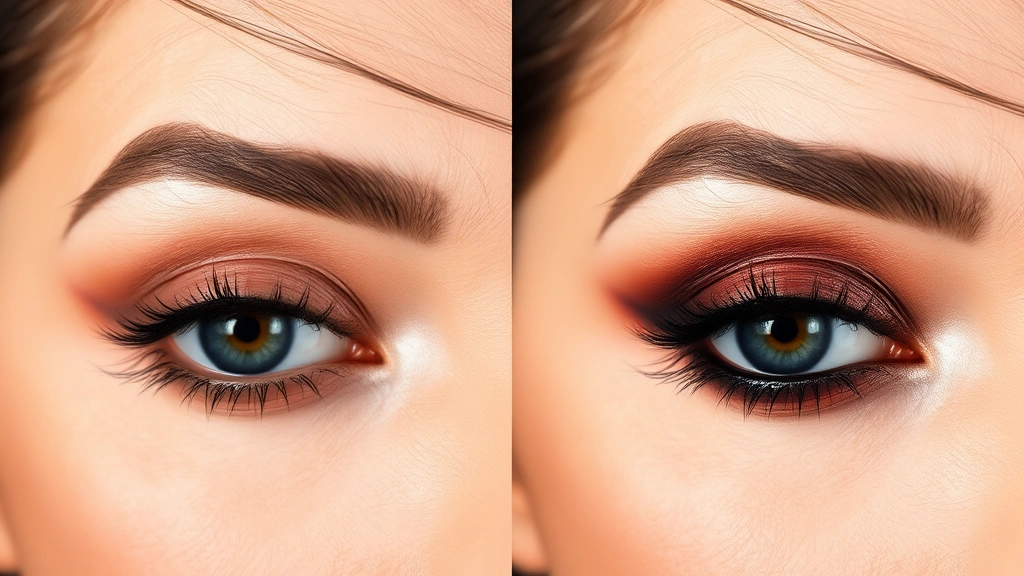
Yes! While smokey eyes are often associated with evening wear, they’re absolutely appropriate for daytime with slight modifications. Use lighter, more neutral shades instead of deep blacks, focus more on the transition and medium shades, and apply less intensity to the dark shade. A lighter smokey eye is perfect for work, casual outings, or daytime events.
What eyeshadow formula works best for smokey eyes—powder, cream, or liquid?
Powder eyeshadows are the most traditional choice for smokey eyes and offer excellent blendability. However, cream eyeshadows can also work beautifully and often provide longer wear. Many professional makeup artists use a combination of both—cream eyeshadows as a base for intensity and powder eyeshadows for blending and diffusion. Liquid eyeshadows are generally less ideal for smokey eyes because they’re harder to blend.
How can I make my smokey eye more dramatic for evening events?
To intensify your smokey eye for evening wear, use deeper, more saturated shades, concentrate darker colors more heavily on the lid and throughout the eye, and consider adding a metallic or shimmer shade to the center of the lid for extra dimension. You can also extend the dark shade slightly beyond your natural eye shape for a more dramatic effect. Use a damp brush when applying dark shades to increase intensity and create a more smudged, dramatic appearance.
What should I do if I make a mistake while applying my smokey eye?
The beauty of the smokey eye is that it’s forgiving! If you apply too much dark shadow, simply use a clean blending brush to diffuse and lighten the area. If you create a harsh line, use your fluffy blending brush with gentle circular motions to soften it. If you apply color unevenly between eyes, simply add more to the lighter eye to match. The soft, blended nature of smokey eyes means minor mistakes are easily corrected.
Related Posts

Perfect Old Fashioned Donut: Baker’s Secrets
Old Fashioned Chocolate Pie Recipe? Chef’s Favorite
