How to Apply Blush? Expert Makeup Tips
How to Apply Blush? Expert Makeup Tips
Blush is the secret weapon that transforms a flat complexion into a radiant, dimensional face. Whether you’re aiming for a natural flush or a bold statement look, mastering blush application is essential for any makeup enthusiast. The right placement, shade, and technique can enhance your bone structure, add warmth to your skin, and create that coveted healthy glow that makes you look refreshed and youthful.
Many people struggle with blush application because they don’t understand how to find their natural flush zones or choose the right formula for their skin type. This comprehensive guide will walk you through everything you need to know about applying blush like a professional makeup artist, including product selection, placement techniques, and common mistakes to avoid.
Understanding Different Blush Formulas
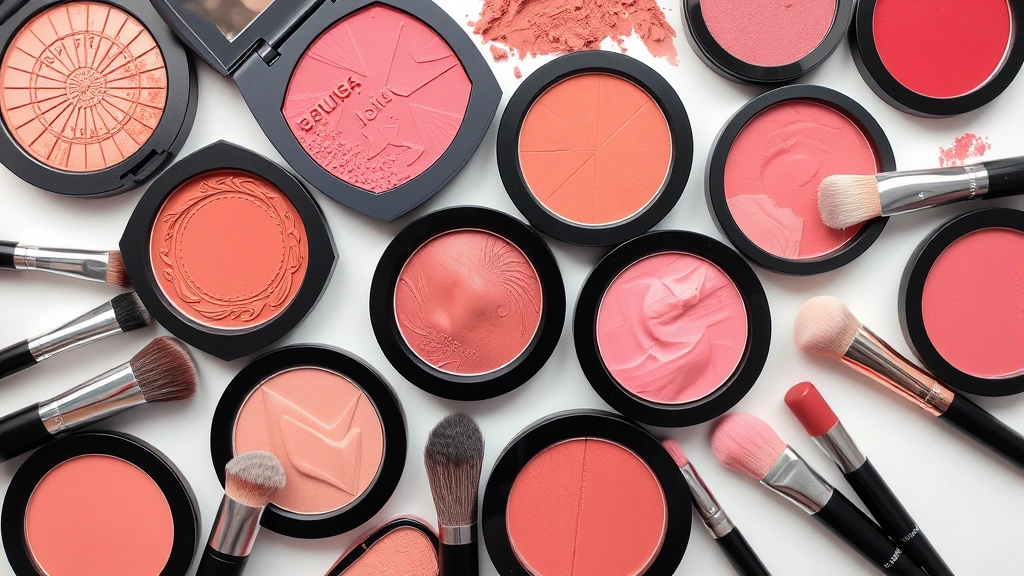
Blush comes in several different formulas, each with its own benefits and best use cases. Understanding these options helps you choose the right product for your skin type and desired finish. Powder blush remains the most popular option because it’s versatile, easy to apply, and works well for most skin types. These finely milled products blend seamlessly and offer buildable color that ranges from subtle to intense.
Cream blush provides a more dewy, natural finish that works beautifully on dry or mature skin. These formulas blend directly into the skin and create a seamless flush that looks like it’s coming from within. Liquid and gel blushes offer the most dimensional finish and are perfect for creating that Instagram-worthy glow. Stick blushes offer convenience and portability, making them ideal for touch-ups throughout the day.
If you’re concerned about the environmental impact of your beauty routine, consider exploring sustainable fashion brands that also offer eco-friendly makeup options. Many beauty brands are now prioritizing sustainable packaging and ethically sourced ingredients.
Finding Your Perfect Blush Shade
Selecting the right blush shade for your skin tone is crucial for achieving a flattering look. Your undertone—whether warm, cool, or neutral—plays a significant role in determining which colors will complement your complexion. Those with warm undertones typically look best in peachy, coral, warm pink, and warm red blushes. Cool undertones are beautifully enhanced by mauve, berry, plum, and cool pink shades.
A simple test to find your perfect shade is to pinch your cheeks and observe the natural color that appears. This is your ideal blush shade reference point. For a more scientific approach, dermatologists recommend considering your skin’s natural flush as a guide for selecting complementary colors.
Fair skin tones often look stunning in light pinks, peaches, and soft corals. Medium skin tones have more flexibility and can wear warm pinks, terracottas, and warm reds beautifully. Deep skin tones are complemented by warm reds, burgundies, berry shades, and warm oranges. The key is experimenting with different shades to find what makes you feel confident and beautiful.
Essential Tools for Blush Application
Having the right tools makes blush application significantly easier and helps you achieve professional results. A fluffy blush brush is the most essential tool—it should be soft, have a tapered shape, and be large enough to pick up product without being too dense. Look for brushes made from synthetic or natural hair that feel comfortable against your skin.
A smaller, more compact blush brush is useful for precise placement and blending, especially if you prefer a more concentrated application. A stippling brush with a denser bristle pattern works well for cream blushes, allowing you to tap the product onto the skin for a natural finish. Some makeup artists prefer using their fingers for cream blush application, which provides warmth and helps the product meld with your skin.
Quality matters when selecting brushes. Invest in brushes that won’t shed, that maintain their shape after washing, and that feel luxurious to use. Proper brush care—washing regularly with gentle cleanser and allowing to air dry—extends the life of your tools and ensures hygiene.
Step-by-Step Blush Application Technique
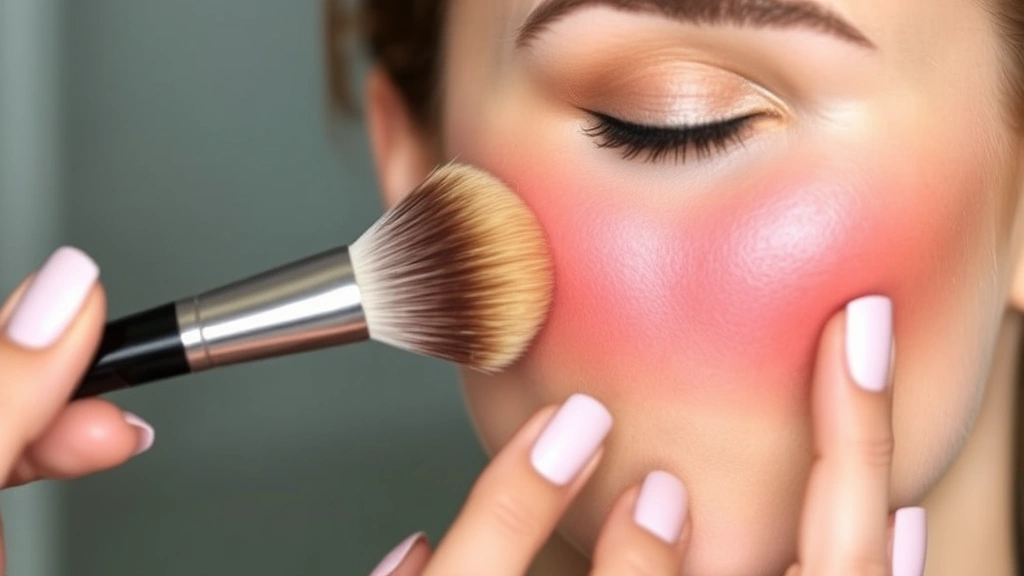
Begin your blush application after foundation and concealer are completely set. Starting with a clean, fluffy blush brush, swirl it gently into your chosen blush product. Tap off any excess product to avoid applying too much color at once. The key to a natural-looking blush is building color gradually rather than applying too much initially.
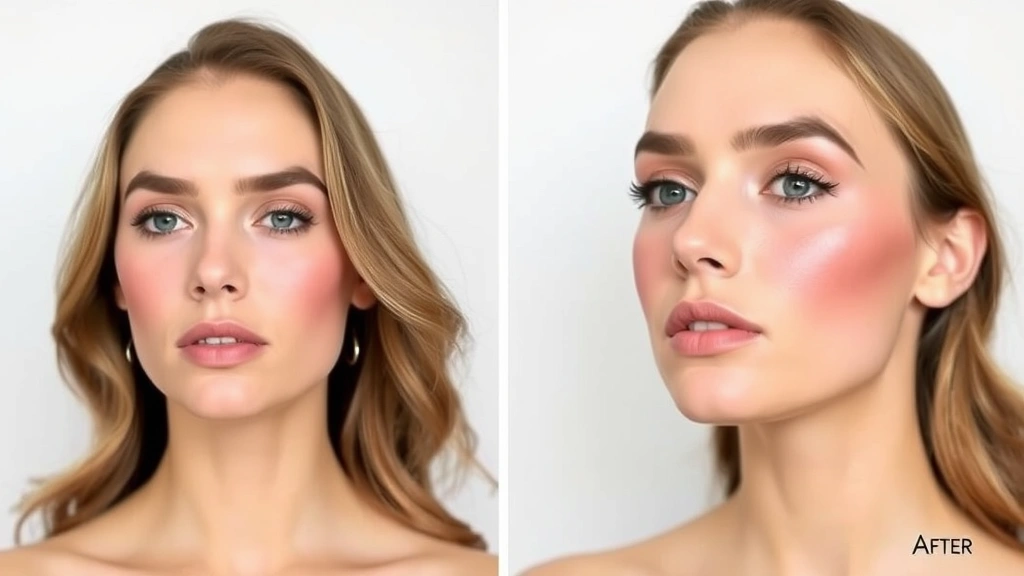
Smile naturally to find your apples—the fullest part of your cheeks when you grin. This is your primary blush placement zone. Apply blush to this area using circular motions, blending upward toward your temples. The color should be most concentrated on your cheek apples and gradually fade as you blend outward.
Use feather-light strokes to extend the blush toward your temples. This creates dimension and prevents harsh lines. For a more lifted appearance, angle your brush slightly upward as you blend, following the natural contours of your face. The blush should look like a natural flush, not a stripe across your cheeks.
If you’re using multiple blush shades—a common technique among professional makeup artists—apply your deeper shade first in the hollows of your cheeks, then layer a lighter, more pigmented shade on top of your cheek apples. This creates depth and dimension that photographs beautifully.
Blush Placement for Different Face Shapes
While the basic cheek apple placement works for most people, adjusting your blush placement based on your face shape creates a more flattering result. For round faces, apply blush slightly higher on the cheekbones and blend it upward and outward toward the temples. This creates a lifting effect that elongates the face.
Square-shaped faces benefit from placing blush on the apples of the cheeks and blending in a circular motion, which softens angular features. Avoid applying blush in straight lines horizontally across the face. Heart-shaped faces look beautiful with blush placed on the apples and blended slightly downward, which balances a wider forehead with a narrower chin.
Oblong faces should apply blush more toward the center of the cheeks, blending slightly outward. Avoid extending blush too far toward the temples, as this can elongate the face further. Diamond-shaped faces benefit from blush applied to the cheek apples with slightly less blending, which adds fullness to the cheekbones and balances the width at the temples.
Advanced Blending and Layering Techniques
Once you’ve mastered basic blush application, exploring advanced techniques elevates your makeup skills. Blending multiple shades creates a customized color that’s uniquely flattering. Start with a cream blush as a base, which provides staying power and a dewy finish. Layer a powder blush on top for dimension and to adjust the final shade.
The American Beauty Association highlights that professional makeup artists often use three-dimensional blush placement—combining a deeper shade in the hollows, a medium shade on the apples, and a lighter, more pigmented shade on the highest points of the cheekbones.
Ombre blush technique involves blending two complementary shades together on your brush before applying. This creates a beautiful gradient effect that looks incredibly sophisticated. Practice blending on the back of your hand first to understand how the colors interact.
Cream blush can be set with a light dusting of translucent powder to increase longevity. However, be careful not to apply too much powder, as this can make the blush look chalky and unnatural. A light hand with setting powder maintains that fresh, dewy appearance.
Common Blush Mistakes to Avoid
Understanding what not to do is just as important as learning proper technique. One of the most common mistakes is applying blush too low on the face. Blush placed on the apples of the cheeks creates a youthful, lifted appearance, while blush applied too low can make your face appear droopy and aged.
Applying too much blush creates a clownish appearance and looks unnatural. Remember that you can always add more, but removing excess blush is difficult. Build color gradually with light layers rather than applying heavy pigmentation all at once. Your blush should look like a natural flush, not a stripe of color.
Failing to blend properly is another frequent mistake. Harsh lines or obvious demarcation between blush and skin look unpolished. Take time to blend using circular motions and feather the edges of your blush application. The transition should be seamless and subtle.
Choosing the wrong shade for your undertone makes even perfect application look unflattering. If your blush looks muddy, ashy, or clashes with your skin, it’s likely a shade mismatch rather than an application problem. Don’t hesitate to exchange products that don’t work with your complexion.
Neglecting to consider your overall makeup look is a mistake many beginners make. Your blush should complement your eyeshadow, lip color, and contour. If you’re wearing warm-toned eyeshadow, your blush should also have warm undertones. This creates a cohesive, harmonious makeup look.
Using dirty brushes compromises both hygiene and blending quality. Wash your blush brushes at least weekly with gentle shampoo and lukewarm water. Clean brushes pick up product more effectively and blend more smoothly than dirty ones.
Many makeup enthusiasts also consider how their beauty routine impacts their overall lifestyle. Just as understanding human-environment interaction helps us make better choices, considering how our makeup products are sourced and packaged reflects our values.
FAQ
How much blush should I apply?
Start with a small amount—about the size of a pea on your brush. You can always add more, but removing excess blush is difficult. Build color gradually with light layers for a natural-looking flush.
Can I use blush as eyeshadow?
Many cream and powder blushes work beautifully as eyeshadow, especially if you prefer a cohesive color story. However, some blushes may be too shimmery or finely milled for eyeshadow application. Test on your eyelid first to ensure comfort and staying power.
How do I fix blush that looks too dark?
If you’ve applied too much blush, use a clean, fluffy brush with no product to gently blend and diffuse the color. You can also use a damp beauty sponge to gently press into the blush and lift some of the pigment away.
Should blush go above or below the cheekbone?
Blush should be applied to the apples of your cheeks (the fullest part when you smile) and blended upward toward your temples. This creates a natural flush and a lifting effect on the face.
What’s the best way to apply cream blush?
Cream blush applies beautifully with your fingertips or a stippling brush. Use your finger to warm the product slightly, then tap it onto your cheek apples and blend with circular motions. This creates a seamless, dewy finish.
How long does blush typically last?
Powder blush typically lasts 6-8 hours with a good primer, while cream blush may last 4-6 hours. Setting your blush with translucent powder can increase longevity. Reapplication throughout the day keeps your flush looking fresh.
Can I wear blush if I have acne-prone skin?
Yes, but choose your products carefully. Powder blushes are generally better for acne-prone skin than cream formulas. Look for non-comedogenic products and ensure your brushes are clean. Avoid applying blush directly over active breakouts.
What’s the difference between blush and bronzer?
Blush adds color to the cheeks and creates dimension on the face, while bronzer adds warmth and simulates a sun-kissed glow. Bronzer is typically applied to areas the sun naturally hits: forehead, temples, and jawline. They serve different purposes in contouring and highlighting.
Related Posts
Perfect Old Fashioned Donut: Baker’s Secrets
Old Fashioned Chocolate Pie Recipe? Chef’s Favorite
