
Old Fashion Donut Makeup Look? Try This Trend
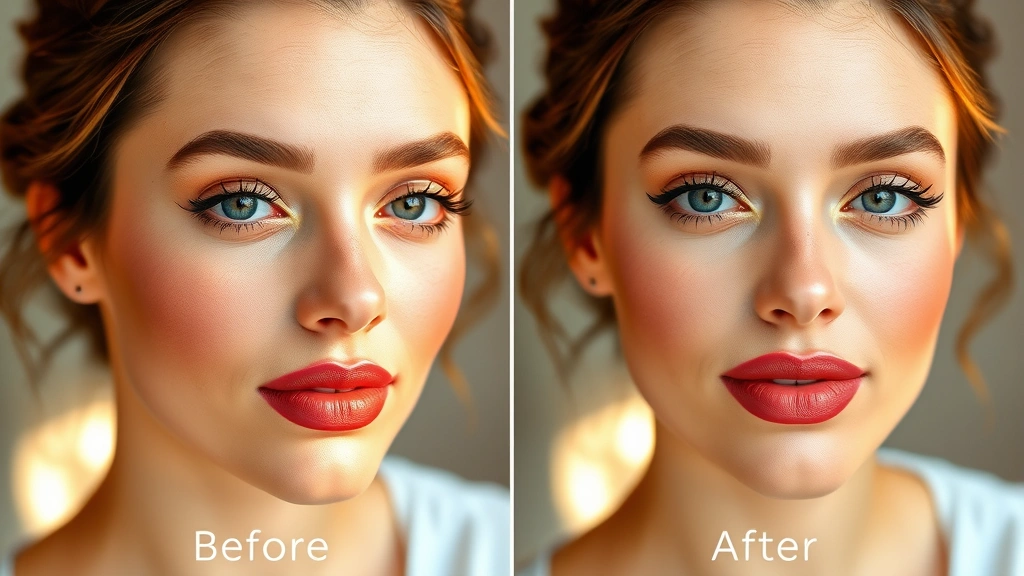
The donut makeup look is having a major moment, and it’s easier to achieve than you might think. This playful, dimensional trend takes inspiration from the classic glazed donut aesthetic—featuring warm, peachy-bronze tones with a luminous center that catches the light beautifully. Whether you’re heading to brunch, a night out, or just want to experiment with a fun new makeup technique, the old fashion donut makeup look delivers that coveted “just-woke-up-like-this” glow with intentional dimension.
What makes this trend so appealing is its versatility and forgiving nature. Unlike some makeup trends that require steady hands and precise application, the donut look celebrates a softer, blended aesthetic that’s actually quite beginner-friendly. The key is understanding how to build warmth on the outer edges of your face while maintaining brightness in the center—a technique that flatters most face shapes and skin tones.
In this guide, we’ll walk you through every step of creating the perfect old fashion donut makeup look, from product selection to blending techniques. You’ll learn how to customize this trend to match your unique features and skin tone, plus discover pro tips that makeup artists use to make their versions absolutely flawless.
What Is Donut Makeup?
The donut makeup look is a contouring and highlighting technique that creates a warm, dimensional effect reminiscent of a glazed donut’s appearance. The concept centers around concentrating warm, peachy, or bronze tones around the perimeter of your face—think cheekbones, temples, and jawline—while keeping the center of your face (forehead, nose, under-eyes, and chin) bright and luminous.
This technique differs from traditional contouring because it’s less about creating harsh shadows and more about building a warm, flattering gradient. The result is a soft, sun-kissed appearance that looks natural while still being distinctly dimensional. Many beauty enthusiasts compare it to the popular makeup trends that emphasize glowing skin, but with more intentional warmth placement.
The old fashion donut variation specifically draws inspiration from classic glazed donuts—those warm, golden-brown pastries with a lighter, shinier center. This version tends to be warmer and more vintage-feeling than some modern interpretations, making it perfect for anyone who loves that nostalgic, cozy aesthetic.
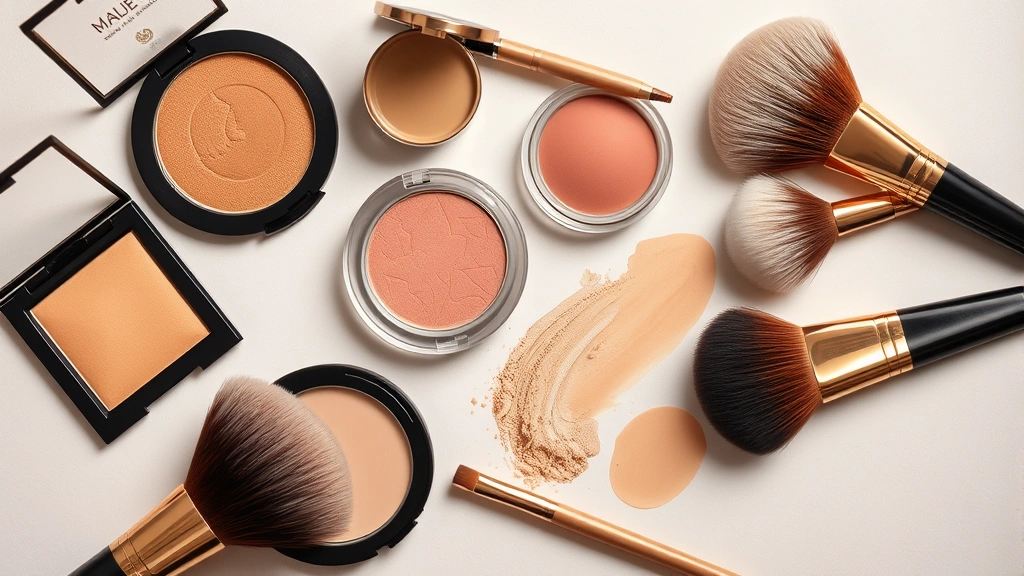
Essential Products You’ll Need
Before you begin, gather these key products to ensure your donut makeup look comes out beautifully:
- Cream or powder bronzer – Look for a shade that’s 1-2 shades deeper than your natural skin tone with warm undertones
- Warm-toned blush – Peachy, coral, or warm pink shades work beautifully for the donut effect
- Highlighter – Choose between champagne, gold, or pearl finishes depending on your preference
- Large fluffy brush – Essential for applying bronzer and blush with a soft, blended finish
- Smaller contour brush – Helps you place warm tones with more precision
- Stippling brush – Perfect for blending highlighter seamlessly
- Foundation or base – A smooth base is crucial for this technique
- Setting spray – Keeps everything in place throughout the day
You don’t need to spend a fortune on products—drugstore options work just as well as high-end alternatives. The key is finding warm-toned shades that complement your skin tone and blend smoothly.
Step-by-Step Application Guide
Now let’s walk through the complete process of creating your old fashion donut makeup look:
- Prime and base: Start with a clean, moisturized face. Apply primer to help everything stay in place, then apply your foundation or tinted moisturizer evenly across your face. Make sure your base is well-blended with no streaks.
- Apply bronzer strategically: Using your large fluffy brush, apply warm bronzer to the outer edges of your face. Focus on your temples, the hollows of your cheeks, your jawline, and the sides of your forehead. Use a light hand—you can always add more, but it’s harder to remove.
- Blend thoroughly: This is where the magic happens. Use circular motions to blend the bronzer into your base, creating a soft gradient rather than a harsh line. The warmth should fade gradually toward the center of your face.
- Add peachy blush: Apply a warm-toned blush to the apples of your cheeks, blending upward toward your temples. This adds dimension while maintaining that warm, donut-inspired aesthetic.
- Highlight the center: Using your highlighter and a stippling brush, apply glow to the high points of your face—cheekbones, brow bones, bridge of nose, cupid’s bow, and the tip of your chin. This creates that luminous donut center.
- Set everything: Lightly mist your face with setting spray to lock in all your hard work.
Choosing the Right Colors
The success of your donut makeup look heavily depends on selecting the right color palette. Here’s how to choose shades that will work beautifully with your unique coloring:
For Fair Skin Tones: Look for light peachy or warm bronze shades for your outer layer. Champagne or light gold highlighter works beautifully in the center. Consider shades like terracotta or warm caramel for dimension without overwhelming your complexion.
For Medium Skin Tones: Medium bronze and warm coral blush create a stunning donut effect. A warmer gold or champagne highlighter adds the perfect glow. You have lots of flexibility here—experiment with both peachy and warmer bronze tones.
For Deep Skin Tones: Rich bronze, warm copper, and deep terracotta shades create beautiful dimension. A gold or bronze-tinted highlighter enhances that luminous center beautifully. Don’t be afraid to go deeper with your outer tones—it creates gorgeous contrast.
The general rule is to choose bronzer shades that are warm and complement your undertones rather than fighting against them. If you have cool undertones, stick with peachy-bronze shades. Warm undertones pair beautifully with golden or copper bronzers.
Mastering Blending Techniques
Blending is absolutely crucial for achieving that soft, dimensional donut effect. Poor blending results in harsh lines that don’t look intentional or flattering. Here are professional blending techniques:
The Circular Motion Blend: Use your fluffy brush in gentle circular motions to blend your bronzer and blush. Start at the edges where the color is darkest and work inward, gradually lifting the product as you move toward the center of your face. This creates that beautiful gradient.
The Feathering Technique: Use light, feathery strokes with minimal product on your brush to blend out harsh lines. This is especially helpful for softening the transition between your warm outer tones and luminous center.
The Stippling Method: For highlighter, use a stippling motion (dabbing rather than swiping) to blend it seamlessly. This prevents the highlighter from looking patchy or overly shiny.
The Layering Approach: Build your warm tones gradually with multiple light layers rather than one heavy application. This gives you more control and creates a more natural-looking result.
Invest in good brushes—they make blending significantly easier. Synthetic brushes work great for cream products, while natural hair brushes are ideal for powders.
Customizing for Your Skin Tone
The beauty of the donut makeup look is how adaptable it is. You can customize the technique based on your specific skin tone and undertones:
Warm Undertones: If you have warm undertones, lean into golden bronze and warm peachy shades. Your donut will have a gorgeous warm glow that looks incredibly natural on you. Consider adding a touch of warm champagne or gold highlighter for that perfect luminous center.
Cool Undertones: Stick with cooler-toned bronzers and peachy-pink blushes. A cool-toned champagne or pearl highlighter creates a beautiful, icy-looking center. Avoid overly warm or orange-toned products, as they’ll clash with your natural coloring.
Neutral Undertones: You’re lucky—you can work with both warm and cool tones. Experiment with different color combinations to see what makes you feel most beautiful. Many neutral undertones find that a mix of warm bronze with a cool-toned highlight creates an interesting, dimensional effect.
Understanding your undertones is key to making any makeup technique work. If you’re unsure, look at the veins on your wrist—blue or purple veins suggest cool undertones, while green or golden veins indicate warm undertones.
Avoiding Common Mistakes
Even with the best intentions, it’s easy to make mistakes when trying the donut makeup look. Here’s what to avoid:
- Applying too much bronzer: Start light and build gradually. Heavy bronzer application looks unnatural and ages the face.
- Skipping blending: Harsh lines are the enemy of this technique. Spend extra time blending to create that seamless gradient.
- Using the wrong undertones: Bronzer that clashes with your undertones will look muddy or ashy. Always choose warm-toned bronzers for this look.
- Neglecting the center: The luminous center is what makes the donut look work. Don’t skip the highlighter.
- Placing blush too far back: Your blush should be on the apples of your cheeks, not way up on your temples. This maintains the soft, dimensional effect.
- Using matte products exclusively: A touch of luminosity is essential. Even if you prefer matte skin, add a subtle glow to the center.
- Forgetting to set: All your hard blending work deserves to last. Use setting spray to keep everything in place.
FAQ
What’s the difference between the donut look and regular contouring?
The donut look is warmer and more gradient-based, while traditional contouring uses cooler tones and creates more defined shadows. The donut technique is also more forgiving for beginners since it celebrates blending and softness rather than precise placement.
Can I create this look with cream products only?
Absolutely! Cream bronzer, blush, and highlighter can create a beautiful donut effect. Many makeup artists prefer cream products for their blendability. Just make sure to set with powder and spray to prevent creasing.
How long does the donut makeup look typically last?
With proper application and setting spray, you can expect this look to last 6-8 hours on most skin types. Those with oily skin may need touch-ups sooner, while dry skin types often see longer wear time.
Is the donut look suitable for all face shapes?
Yes! The beauty of this technique is its universal flattery. The warm outer tones add dimension to any face shape, while the luminous center brings attention to your best features. Adjust placement slightly based on your face shape—for round faces, apply bronzer more to the temples and jawline; for long faces, focus on the hollows of the cheeks.
What’s the best way to fix mistakes while applying?
If you apply too much bronzer or blush, use a clean, fluffy brush to gently blend it out further. You can also use a light-handed approach with your foundation to slightly tone down overly dark areas. Keep a makeup wipe nearby for quick fixes.
Can I wear the donut look with bold lips?
Definitely! The donut look is actually quite versatile. Pair it with a bold red lip for drama, a nude lip for sophistication, or a berry lip for a cohesive warm look. The fashion and beauty world constantly celebrates mixing warm face makeup with bold lip colors.
Which season is best for the donut look?
While the warm tones make it perfect for fall and winter, you can wear the donut look year-round. In summer, simply use lighter shades and less product for a more subtle effect. Spring pairs beautifully with peachy variations of this technique.
How do I prevent the donut look from looking muddy?
The key is using shades that complement your undertones and blending thoroughly. Muddy appearance usually comes from mixing conflicting undertones or not blending enough. Also, make sure your base is smooth and even before applying bronzer and blush.
Related Posts
Perfect Old Fashioned Donut: Baker’s Secrets
Old Fashioned Chocolate Pie Recipe? Chef’s Favorite
