How to Do 1940s Makeup? Expert Tips Inside
How to Do 1940s Makeup: Expert Tips Inside
The 1940s represented one of the most glamorous and distinctive eras in beauty history. Whether you’re preparing for a vintage-themed event, creating an authentic costume, or simply fascinated by classic beauty aesthetics, mastering 1940s makeup is an exciting journey into timeless elegance. This decade gave us iconic looks featuring bold brows, perfectly sculpted cheekbones, and those signature red lips that still define Hollywood glamour today. The beauty techniques from this era weren’t just about following trends—they were about creating a polished, put-together appearance that conveyed confidence and sophistication.
What makes 1940s makeup truly special is how it balanced drama with refinement. Women during this period had limited product options compared to today, yet they created stunning faces using clever techniques and strategic color placement. The makeup philosophy centered on enhancing natural features while adding theatrical flair that photographed beautifully in black-and-white cinema. Understanding these principles will help you recreate authentic 1940s looks whether you’re wearing 1940s fashion dresses or simply exploring this captivating beauty era.
Essential Products for 1940s Makeup
Before diving into technique, let’s discuss the products you’ll need to achieve an authentic 1940s makeup look. The beauty industry of the 1940s operated with fewer options than we have today, but the quality and pigmentation of available products were impressive. You don’t necessarily need vintage products—modern formulations work beautifully for recreating these looks with better longevity and easier application.
Start with a good foundation that matches your skin tone perfectly. During the 1940s, women used cake foundation or liquid bases applied with sponges or brushes. A modern full-coverage foundation works wonderfully for achieving that matte, polished finish characteristic of the era. You’ll also need a concealer for covering blemishes and under-eye darkness, as the 1940s aesthetic prioritized flawless skin.
For eyes, gather a selection of neutral eyeshadow shades in browns, taupes, and golds. The 1940s favored earth tones and warm neutrals, with occasional use of subtle blues or greens. A black or dark brown eyeliner pencil is essential—this was the defining eye product of the decade. You’ll want both a pencil and liquid liner to experiment with which application method suits you best. Black mascara was absolutely crucial, and women often applied multiple coats to achieve dramatic lashes.
Blush was a staple product, typically in warm rose or coral tones. A powder formula works best for achieving that slightly matte finish popular during this period. Finally, red lipstick is non-negotiable for an authentic 1940s look. The specific shade matters less than the finish—aim for a classic blue-red or warm red with a cream or satin finish.
Creating the Perfect 1940s Eyebrows
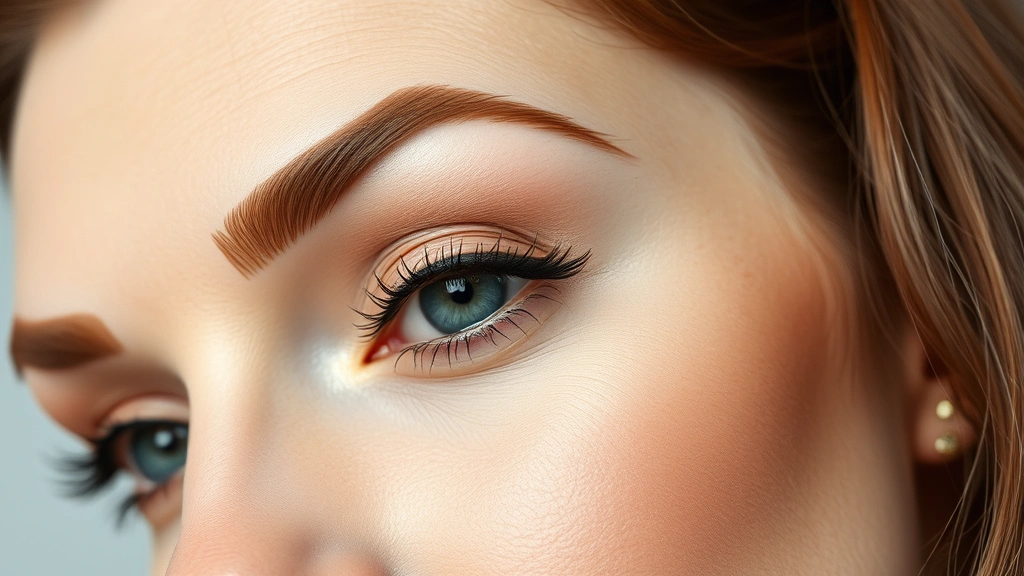
Eyebrows in the 1940s were dramatically different from contemporary trends. The decade favored high-arched, dramatically shaped brows that created a striking frame for the face. This wasn’t a subtle, natural brow look—it was bold, intentional, and utterly glamorous. Understanding how to shape and fill your brows properly is foundational to achieving an authentic 1940s appearance.
The ideal 1940s brow started thin at the inner brow, gradually thickened toward the arch, and peaked at a dramatic angle before tapering to a thin tail. The arch was positioned relatively far back on the brow, creating that characteristic lifted appearance. If your natural brows don’t follow this shape, don’t worry—brow products can create the illusion of proper 1940s architecture.
Begin by brushing your brows upward and outward using a spoolie brush. This reveals your natural brow shape and helps you identify where to add definition. Using a brow pencil or powder, map out the three sections: the head (inner part), arch (highest point), and tail (end). The arch should be positioned roughly two-thirds of the way across your brow. Fill in any sparse areas with short, feathering strokes that mimic natural hair growth, but don’t be afraid to create definition beyond your natural brow line—1940s brows were intentionally sculpted.
Once you’ve filled in the base, use a slightly darker shade along the underside of your brow to create definition and depth. This technique makes the arch appear higher and more dramatic. Set everything with a clear or tinted brow gel, brushing the hairs into place and locking the product there. A strong, defined brow is the foundation of 1940s makeup, so invest time in getting this right.
Achieving Flawless Base and Complexion
The 1940s beauty standard demanded porcelain-like skin with absolutely no visible blemishes or texture. Achieving this look required careful foundation selection and application. The goal was a matte finish with full coverage—dewy skin wasn’t part of the 1940s aesthetic. This is actually liberating if you have oily skin, as the matte finish is easier to maintain throughout the day.
Start with a primer that suits your skin type. If you have dry skin, use a hydrating primer; if you’re oily, choose a mattifying formula. Apply your foundation using a damp sponge, pressing it into the skin rather than dragging or buffing. This technique builds coverage gradually while maintaining a natural appearance. Focus on achieving even coverage across your face, paying special attention to areas that need more coverage like blemishes or dark spots.
Once your base is set, use a concealer one shade lighter than your skin tone to highlight and brighten certain areas. Apply concealer under the eyes in an inverted triangle shape, along the bridge of your nose, on your chin, and above your cheekbones. These areas should have a subtle glow that makes your face appear lifted and three-dimensional. Pat everything gently with a damp sponge to blend seamlessly.
Set your base with a translucent powder, using a fluffy brush to apply it in a pressing motion rather than sweeping motions. This prevents disturbing your foundation while ensuring longevity. Pay special attention to your T-zone, where oil tends to accumulate. The result should be a smooth, porcelain-like canvas ready for the rest of your makeup.
If you want to learn more about how beauty practices have evolved with our environment, you’ll find interesting perspectives on sustainable beauty choices that honor both heritage and modern values.
Mastering Eye Makeup Techniques
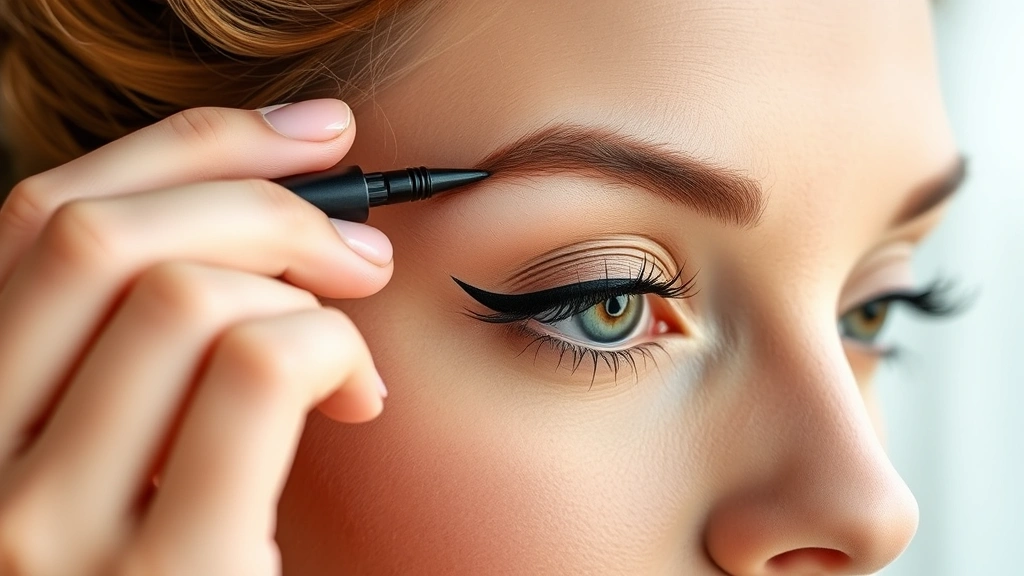
Eye makeup in the 1940s was bold, dramatic, and expertly executed. The signature look featured defined crease lines, emphasized lids, and heavy mascara that created an almost doll-like appearance. This was the era when movie starlets set beauty standards, and every woman aspired to eyes as captivating as their favorite actresses.
Begin by applying a matte eyeshadow base all over your eyelid, from lash line to brow bone. This creates adhesion for your eyeshadow and prevents creasing throughout the day. Choose a neutral shade close to your skin tone for this step. Once set, apply a slightly darker neutral shade (taupe, light brown, or soft bronze) all over your lid, blending it upward into your crease.
The key to 1940s eyes is the dramatic line created along the crease. Using a darker brown or black eyeshadow and an angled brush, define your natural crease with a strong line. This isn’t meant to be subtle—it should be visible and intentional. Blend the edges slightly so it doesn’t look harsh, but maintain the definition. This crease line is what gives 1940s eyes their distinctive shape and drama.
Next comes the eyeliner—arguably the most important step for 1940s eyes. Using a black or dark brown eyeliner pencil, line your upper lash line with a medium thickness. The line should be relatively straight without the winged flicks that became popular in the 1950s. Some women in the 1940s did apply a thin line along the lower lash line, but this was optional and subtle. The focus was always on the upper lash line.
Finish your eyes with generous mascara application. The 1940s mascara look required multiple coats to achieve maximum volume and definition. Apply your first coat, let it dry, then apply a second coat. Some women even applied a third coat for special occasions. Wiggle the mascara wand from root to tip, ensuring every lash is coated. If you have naturally sparse lashes, consider using false lashes to achieve that full, dramatic appearance.
Iconic Red Lips and Lip Techniques
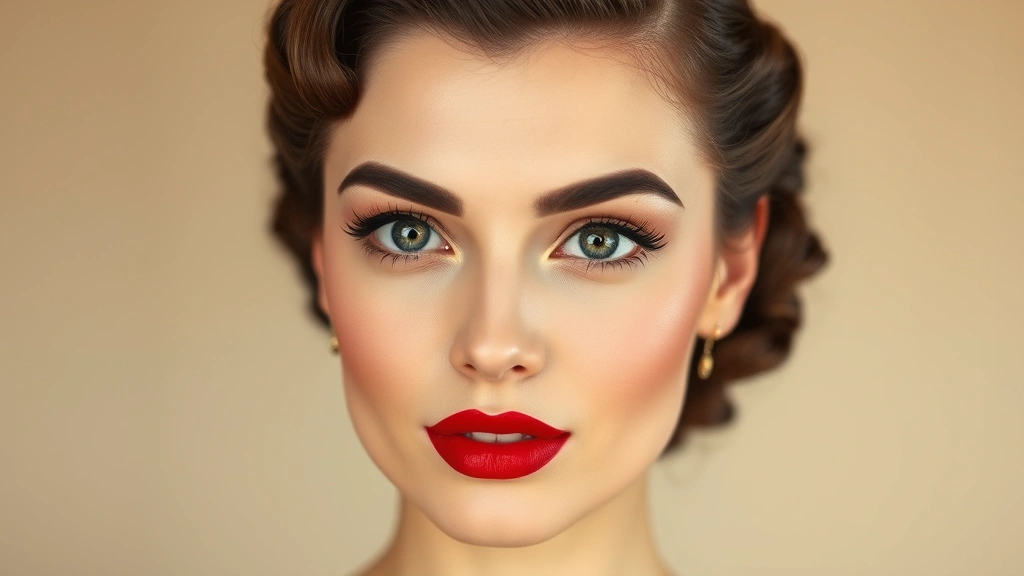
No 1940s makeup look is complete without the iconic red lip. This wasn’t just a color choice—it was a statement of confidence and glamour. Red lips became synonymous with the decade, worn by women of all ages and backgrounds. The specific shade varied slightly depending on undertones and personal preference, but the boldness remained constant.
Before applying lipstick, prepare your lips by exfoliating gently and applying a hydrating lip balm. Let the balm absorb for a minute, then blot away any excess. This creates a smooth base for lipstick application and prevents the color from appearing patchy or settling into fine lines. If your lips are naturally very pigmented, consider using a lip primer to create an even base.
For precise application, use a lip liner in a shade matching your lipstick. Line your lips carefully, following your natural lip line but with intentional, clean edges. The 1940s lip shape was typically well-defined with a slight emphasis on the center of the lower lip, creating a subtle pouty effect. Apply your red lipstick directly from the tube or with a lip brush for maximum control.
The shade of red you choose matters more than you might think. Blue-based reds (like classic fire-engine red or burgundy) suit cooler undertones and photograph beautifully in black and white. Warm-based reds (like tomato red or orange-red) flatter warmer undertones and create a more approachable look. Experiment with different shades to find your perfect 1940s red. A cream or satin finish looks more authentic than glossy formulas, as shine wasn’t emphasized during this era.
Blot your lipstick with a tissue after the first application, then reapply for better longevity. This technique, called layering, helps the color stay put throughout the day. Keep your lipstick with you for touch-ups, as maintaining that perfect red lip was part of the 1940s beauty routine. Many women carried lipstick and a compact mirror everywhere they went.
Contouring and Blush Placement
While the term “contouring” is modern, the technique of using darker and lighter shades to sculpt the face was absolutely part of 1940s makeup. The goal was to create dimension and highlight the best features of your face. Unlike modern contouring, which can be quite dramatic, 1940s contouring was subtle and blended seamlessly.
Start with blush application, which was a crucial step in 1940s makeup. Using a warm rose or coral shade, apply blush to the apples of your cheeks by smiling and placing color on the highest point. Blend upward toward your temples, creating a soft, diffused flush. The 1940s blush placement was typically higher and further back on the cheekbones than contemporary trends, creating a lifted appearance that complemented the high arches of the eyebrows.
Once your blush is applied, use a shade slightly darker than your skin tone to add subtle dimension. Apply this contour shade along your hollows (suck in your cheeks to find them) and blend carefully. This should be barely noticeable—you’re not trying to create obvious shadows, but rather subtle depth. Apply the same shade along your jawline to define it, and blend a touch along your temples to frame your face.
Highlight your best features using a shade one or two shades lighter than your skin tone. Apply this to the tops of your cheekbones, down the center of your nose, on your chin, and on your cupid’s bow. These subtle highlights should catch the light and make your features appear more prominent and dimensional. The key to 1940s contouring is subtlety—everything should blend seamlessly so the viewer sees a beautiful face, not obvious makeup techniques.
Setting Your 1940s Makeup for Longevity
Once you’ve created your complete 1940s makeup look, setting it properly ensures it lasts throughout the day or evening. The 1940s didn’t have modern setting sprays, but women used various techniques to keep their makeup intact, including powder, setting lotions, and careful touch-ups.
Begin by setting your entire face with translucent powder using a large fluffy brush. Use a pressing motion rather than sweeping, which helps the powder adhere without disturbing your makeup. Pay special attention to areas prone to oiliness. If you have very dry skin, you can skip the powder in some areas to prevent a chalky appearance.
Next, apply a setting spray to lock everything in place. While not available in the 1940s, modern setting sprays are perfect for achieving the longevity that 1940s women would have desired. Hold the bottle about arm’s length away and mist your entire face lightly. Let it dry naturally without touching your face. This creates a protective barrier that helps your makeup withstand heat, humidity, and movement.
Throughout the day, keep blotting papers handy to manage shine without disturbing your makeup. Rather than reapplying powder, which can cake, use blotting papers to gently press away excess oil. Keep your red lipstick with you for touch-ups, as this is the most visible element that needs refreshing. A compact mirror and lipstick were essential accessories for any 1940s woman, allowing for quick touch-ups anywhere.
If you’re wearing this look for an extended period, consider doing a complete makeup refresh midway through. Remove any smudged eyeliner with a cotton swab, reapply mascara if needed, and freshen your lipstick. This might seem like extra effort, but maintaining that polished 1940s appearance was considered part of being put-together during this era.
For those interested in how beauty practices connect to broader cultural values, exploring human-environment interaction reveals how our choices in beauty products affect the world around us.
FAQ
What’s the most important product for achieving 1940s makeup?
While every product plays a role, red lipstick is the most iconic and instantly recognizable element of 1940s makeup. You could theoretically create a simplified 1940s look with just red lipstick, defined brows, and mascara. However, the full experience includes a flawless base, dramatic eyes, and properly placed blush. According to beauty experts at Beauty Tips, the combination of all elements creates the authentic 1940s aesthetic.
Can I wear 1940s makeup if I have warm undertones?
Absolutely! Warm undertones actually look beautiful with 1940s makeup. Choose warm-based red lipsticks (orange-reds or tomato reds) instead of cool-based blues. Use warm-toned eyeshadows like bronze, warm brown, and gold. Apply blush in coral or warm rose shades. Warm undertones photograph particularly well with 1940s makeup, creating a harmonious, glowing appearance.
How do I make my eyebrows look 1940s if they’re naturally straight?
Use an angled brow brush and brow powder or pencil to create the arch. Map out where your arch should be (roughly two-thirds across your brow), then use slightly darker product to define this area. Build the height gradually with multiple thin layers rather than one heavy application. The arch doesn’t have to be extreme—even a subtle lift creates that 1940s effect. Practice makes perfect, so don’t get discouraged if your first attempts aren’t perfect.
Is 1940s makeup appropriate for everyday wear?
While 1940s makeup is dramatic, simplified versions work beautifully for everyday wear. Skip the heavy mascara and multiple eyeshadow layers for a lighter version. Use a nude or pink lipstick instead of red for a more subtle look. Keep the defined brows and flawless base, which are flattering on everyone. This creates a polished, put-together appearance without the full theatrical effect of a complete 1940s look.
What if I don’t like red lipstick?
While red is iconic, you can adapt 1940s makeup to other lip colors. Deep burgundy, wine, or even coral-red create a similar effect with slightly different undertones. Some women in the 1940s wore darker reds or even plum shades. Experiment with different red family shades to find one that makes you feel confident. The key is choosing a bold, saturated color rather than pale or nude shades.
How does 1940s makeup compare to other vintage eras?
1940s makeup differs significantly from 1930s and 1950s looks. The 1930s featured thinner, more angular brows and softer eye makeup. The 1950s introduced winged eyeliner and slightly different blush placement. The 1940s occupies a middle ground with bold brows, dramatic eyes, and statement red lips. Understanding these distinctions helps you achieve authentic period looks. For comprehensive beauty history, Allure’s makeup history articles provide detailed comparisons.
Can men wear 1940s makeup?
Absolutely! Makeup is for everyone regardless of gender. 1940s makeup can be adapted to anyone’s preferences and skin type. Some elements, like the defined brows and red lips, transcend gender and look stunning on anyone with the right confidence. The theatrical nature of 1940s makeup makes it perfect for performers, drag artists, or anyone who simply loves the aesthetic.
How long does it take to apply 1940s makeup?
A complete 1940s makeup look typically takes 30-45 minutes once you’re practiced. Initially, it might take longer as you learn proper technique. The most time-consuming steps are usually creating the flawless base and applying eyeshadow with precision. With practice, you can streamline the process. Many women in the 1940s spent considerable time on their makeup, viewing it as an important part of their daily routine rather than a quick process.
Mastering 1940s makeup is a rewarding journey that connects you to a glamorous era of beauty history. Whether you’re wearing 1940s fashion dresses to a themed event or simply exploring vintage aesthetics, these techniques create a stunning, recognizable look that never goes out of style. The key is practice, patience, and confidence in executing these bold techniques. Start with one or two elements, master them, then gradually incorporate more complex steps. Soon you’ll be creating authentic 1940s makeup that turns heads and transports everyone around you back to Hollywood’s golden age.
Related Posts
Perfect Old Fashioned Donut: Baker’s Secrets
Old Fashioned Chocolate Pie Recipe? Chef’s Favorite
